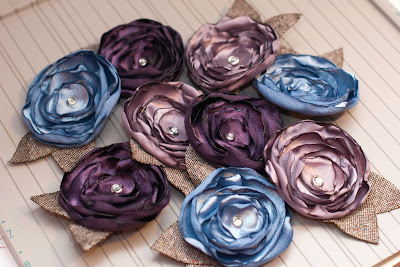
From the moment I got engaged last October, I knew I wanted to make a fabric bouquet. There were a number of reasons for this. Firstly, I hated the idea of dying flowers. Just. Plain. Wasteful. Secondly, I really wanted to make my wedding meaningful to me and handcrafting the bouquets did just that. I started off experimenting with polyester fabrics when I made some satin flower pins for my girlfriends that attended my stagette.
With the same idea in mind, I set out to create a variety of different types of satin flowers. I love the look of the melted edges of satin. It made each flower unique in it's own way and no two flowers would ever look the same. I purchased some white, ivory and champagne colored satin along with some organza and tulle. I tried cutting out a bunch of different shapes to see what they would look like melted. I ended up using a lot of circles, ovals, and flower shaped pieces. Some used only one color of satin while other flowers used a combination of fabrics and colors.
That was a quick photo I took with my phone one night. I used a hot glue gun to attach all the pieces, something that saved me loads of time because with the original flower pins I made for the girls, I hand stitched the petals together. Not smart. After making what seemed like a hundred individual flowers, I embellished them with some bling. Some had rhinestones in the middle and some had glass beads. Flowers can't be flowers without stems so I attached floral stems that I purchased at Michael's and Dollar Giant using floral tape and more hot glue. Then I bunched them all together to make my wedding and 2 bridesmaids' bouquets.
I made my bouquet bigger than the rest, 2 medium sized bouquets for my bridesmaids and one itty bitty one for the bouquet toss. I didn't want a red bouquet and after looking at pictures of red and white bouquets, I decided against that too. To incorporate red into my bouquet, I just wrapped the stems in a red satin ribbon. They turned out way better than I expected. Future plans for my bouquet you might ask? I was hoping to make a shadow box with my wedding stuff... Haven't gotten that far yet though.
Wednesday, December 28, 2011
Monday, December 12, 2011
Liz's Garter
 It's super past both mine and Liz's wedding but I still want to share some of the crafting that was done for our weddings. Garters aren't all that expensive but I really wanted to make one for Liz. Why you might ask? What didn't I want to make for our wedding? I thought it would be super easy to do. I had a general idea of how to piece it together so really... how hard could it be?
 Well sadly, I thought that the elastic lace would create enough of a band to go around the leg. As you can tell from the picture, that itty bitty amount of elastic from the lace just wasn't going to cut it. So after sewing it the first round, I had to go back and find some actual elastic to sew onto the garter. Wasn't easy considering my needle wasn't made to go through such thick material and I'm just not all that great at sewing. In the end, it all worked out. Just don't look at it too closely. I tried to disguise my bad sewing job with a nicely tied bow!
After sewing one garter, I definitely didn't want to sew another so I told Jamie that he must catch the garter at Liz's wedding. Catch it he did! Phew!
Subscribe to:
Comments (Atom)


